We love good food in our home. I love to cook and bake for my family. I have shared recipes and pictures of our yummy goodness on different venues. Many have suggested a blog to share the recipes.

*DISCLAIMER* I am not a professional cook, photographer or writer!

I will always try to give credit for recipes. Many I have collected over the years off of TV, various websites, friends and family.

Please leave comments if you try a recipe or share variations of things I post, I always love learning new tricks of the trade.

Sunday, July 31, 2011

Eggplant & Italian Sausage Casserole

I mentioned in a previous post about the Harvest Box I received from my local Farmer's Market. In this past week's box I got three eggplant. Now I am going to admit that I had never really given eggplant a chance and I was hesitant to do something with it even now. But I decided I was going to be brave and try it. I surprised myself and four of my five family members with this dish. We all actually like it and it has already been requested that I make it again. (My 10 year old is the one who didn't like it and to be honest, he didn't even try it, he did however enjoy the sausage and sauce!) My 13 year old enjoyed just the fried eggplant and told me to make some more!

This recipe was super easy to make! (I found this recipe in the Pioneer Woman's Tasty Kitchen...here is the blog I found it at.)

Eggplant & Italian Sausage Casserole
1 1/2 pounds of ground Italian sausage
1 large eggplant (or two small ones work as well)
4 cups mozzarella cheese (I also added in some Parmesan cheese for a little extra flavor)
8 cups spaghetti sauce (as you can see I make my own but store bought works just as good)
1 cup flour
oil for frying
salt
1 cup milk
Peel and slice the eggplant in rounds about 1/4 inch thick. Sweat your eggplant (sweating helps to pull the bitterness out of it, it is mostly in large eggplants but some smaller ones can be bitter as well. If nothing else you are seasoning the eggplant. How do you sweat an eggplant? Place slices on a kitchen towel or on paper towels in a single layer. Moderately salt each slice. When the eggplant sweats (about 10 minutes) flip each slice over and repeat the process.)
After the sweating is complete heat up about 1/2 cup of oil in a skillet on medium heat. Dip each slice in milk and then flour and fry until slightly brown.
(I do not know why this picture turned and won't turn back, so sorry, it wants to be posted in this direction and so I'm leaving it!)
Drain on a paper towel. In a separate skillet brown and drain the sausage. Add the spaghetti sauce to the sausage.
Assembling the casserole: Spray a good size casserole dish and spread about 1/4 cup sauce on the bottom. Place a layer of fried eggplant on the sauce.
Next spread part of the sausage mixture on top of the eggplant. Sprinkle the cheese on top of the sausage. Repeat the layers until all ingredients are used ending with the cheese on top.


Bake covered at 350 degrees for about 45 minutes or until it bubbles.


Saturday, July 30, 2011

Quick & Easy Hawaiian Punch

The other night I receive a frantic text from a friend who needed to come up with refreshments for a ceremony the next day. We talked and I shared with her this fool proof punch. I love this punch, I have used it for years and everyone always enjoys it. It's simple to make and you can pour it into a punch bowl, accent it with some orange or lime slices and it looks like you worked so hard!

Quick & Easy Hawaiian Punch
1 (12 oz) can frozen orange juice plus 12 oz water
1 (12 oz) can frozen lemonade plus 12 oz water
1 (6 oz) can frozen limeade plus 6 oz water
1/2 cup sugar
1 (46 oz) can unsweetened pineapple juice
2 - 2 liter bottles of gingerale or Sprite

In two (1 gallon) jugs/pitchers (you will split the syrup), combine the all the ingredients EXCEPT for the soda. Shake to mix well. Fill jugs to the 1 gallon mark with water. Refrigerate (the longer it sits, the more the flavors blend). At serving time, pour 1 gallon mix in punch bowl and slowly add 2 bottles of chilled soda.

Roasted Corn & Black Bean Salsa

(Ignore the green pepper that obviously wanted to be a part of this salsa!)

Roasted Corn & Black Bean Salsa

4 cups (or two cans) black beans, drained and rinsed

3 ears roasted corn, kernels cut away (about 2 cups) (directions for roasting corn are at the bottom of this entry)

1 large tomato, chopped

1 to 2 jalapeno peppers, seeded and minced

1 cup onion, finely chopped

1/2 cup loosely packed cilantro leaves, torn

2 tablespoons white wine vinegar

1/4 cup freshly squeezed lime juice (or as you can see, I used lime juice from the bottle)

salt and pepper to taste

Combine all ingredients in a large mixing bowl. Cover (and refrigerate if desired) for at least 1 hour to allow flavors to develop.

How to Roast Corn

Preheat the barbecue grill to a medium temperature (350 degrees F).

If you have soaked your corn, remove the corn from the water and shake off any excess water.

Tear off squares of aluminum foil and place ears of corn diagonally in the center of each square of aluminum foil.

Brush the kernels with olive oil.

Roll the aluminum foil around each ear of corn and close it up by twisting the ends.

Place the prepare ears of corn on a medium heat grill, rotating the corn every so often.

Allow the corn to slowly continue cooking for another 15 to 20 minutes.

Remove the corn from the grill. Be careful the foil will be very hot!

Once the corn is cooked, remove the aluminum foil.

Friday, July 29, 2011

Dinner Rolls

We love bread in our home...these rolls are so easy to make when you use your bread machine to make your dough. I love my bread machine, we've had it for over 13 years and it just makes me happy!

Dinner Rolls

1 Egg, room temperature plus 1 1/2 cups + 2 TBL water [80 degrees F] (put egg in measuring cup first and fill with water slowly until it meets measurement listed above)
1/4 cup oil
1/2 cup sugar ( you can substitute 1/4 cup honey if you desire)
1/2 tsp salt
4 1/4 cup bread flour
2 1/2 tsp bread machine yeast (or 3/1 tsp active dry yeast or 2 1/2 tsp quick rise yeast)

Remove the bread pan from the bread maker. Make sure the kneading blade is on the shaft (you may snicker but I have had to dump out ingredients to put it in, just trying to help you all out!). Make sure all ingredients (except water) are at room temperature.

Place whole, uncracked egg in a bowl of warm water for 15 minutes to bring to room temperature. To measure egg plus enough liquid to equal - after warming eggs, remove from shell and place in liquid measuring cup, slowly add warm (80 degree F) liquid until it reaches desired measurement.

Add oil, sugar and salt. Add flour, smoothing it out and tapping bread pan to settle dry ingredients.

I usually make a little well for my yeast in the center. Add yeast.


Place bread pan in bread machine. Select Dough setting and press start.At the beep, check your dough, it should be tacky to the touch. Remove from bread pan carefully onto a floured surface. Divide into pieces and shape (I just roll them into balls as you can see. They aren't the prettiest but they still taste quite yummy). Place in greased baking pan.

Cover and let rise in a warm place for an hour or until double in size. (If you live in an area that makes it hard for your dough to rise, try setting your oven at 250 degrees for 5 minutes then turning it off and setting your pan in oven to let dough rise).

Bake at 350 degrees for 20-30 minutes.

These are so soft inside! My family LOVES these rolls. We eat them hot with butter or apple butter!

Cucumber, Onion & Tomato Salad

We love our local Farmer's Market here. It's not huge but it gives us most of what we need. The owner of the market here has started weekly Harvest Boxes that will include various items that she either gets from her own garden or purchases from other local gardeners/farmers. You can check out her facebook page if you are in our area. My goal is to share recipes using the items I get in my various boxes throughout the weeks.

This week I am using the cucumbers, onion and tomatoes from my box and making this simple salad for my husband. He's already tried it and enjoys it!

Cucumber, Onion, Tomato Salad

3-4 medium tomatoes diced or sliced the way you want them

2 medium cucumbers, peeled & sliced

1 onion, sliced and separated into rings

2 Tbsp. white vinegar (if you want your salad a bit tangier, use apple cider vinegar)

1/4 c. olive oil (or you can use whatever kind of oil you would like)

2 Tbsp. sugar

1 tsp. salt

1/2 tsp. black pepper

2 tsp. minced fresh parsley. (dry parsley is fine too)

Set aside your cut up tomatoes, cucumbers & onions.

In a bowl or mason jar (at least a gallon size for this recipe), pour in the remaining ingredients and mix or shake.

Add your tomatoes, cumbers, and onions and toss until everything is combined.

Marinate for a while. This tastes good once it’s done but the longer it marinates, the more the flavors blend. Enjoy!


Tuesday, July 26, 2011

Doggy Ice Cream

The furry children in our home may be slightly spoiled, I totally admit that. They are spoiled with love mostly as we try hard to give them a healthy diet. As I was reading one of my twitter friend's blogs, I came across a simple recipe for a fun treat for our pampered pups! As hot as it has been around here, our family has enjoyed lots of cool treats and I thought it would be fun to give our girls a little fun treat too. This ice cream was so easy to make and our puppies LOVED it!


So head on over and check out the recipe for Dog Ice Cream!

*Note - while my dogs did not eat the paper cup, apparently some dogs do so watch your dogs so they don't eat all that paper!

Sunday, July 24, 2011

Simple Crepes

Crepes
  • 2-½ cups Milk (heated for about 45 seconds in the microwave)
  • 3 whole Eggs
  • 1 Tablespoon Granulated Sugar
  • ½ teaspoons Salt
  • 2 Tablespoons Melted Butter
  • ½ teaspoons Pure Vanilla Extract
  • 1-¼ cup Flour

Combine all ingredients together in a bowl until the mixture is well combined. It is supposed to be thin and runny.

On medium heat, heat your frying pan or if you are fancy enough to own a crêpe pan (personally I use my paella pan) and melt in some butter (Pam cooking spray works fine too, I just like the butter flavor). Using a ladle works the best to pour your batter into the pan. You can twist your pan to help spread it or use your ladle to spread it out.

Keep in mind that crêpes are meant to be thin, if it is too thick, it will not cook properly.

When the edges start to brown, it is time to flip. This will take 3-4 minutes. Flip the crêpe. The other side should take about 2 minutes.

You can have so much fun with filling your crepes. We like to use jelly/jams and topping them with whipped cream and sliced fruit.

You can leave out the sugar and add different seasonings for savory crêpes and then fill them with vegetables or the different flavored cream cheeses.

Enjoy!

Wednesday, July 6, 2011

Easy Beef Jerky

Now I am no beef jerky makin' expert, I just want to throw that out there right away. My family loves my beef jerky but they may be slightly biased. Everyone who has tried my jerky over the years I have made it (like the girls at girls camp who ate it all in like 2 hrs!), like it too, so I guess it's pretty decent.

I keep it simple..real simple.
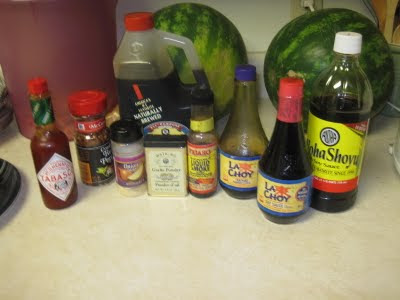
I did not put all of this stuff into one batch of jerky but these are some of the variations I used for the 10 lbs of jerky I am currently in the process of making for my boys to take to Boy Scout Camp.

My base for jerky is always some type of soy sauce. Salt is important when making jerky because salt helps in the drying process. I use a marinade vs. a dry rub so the soy sauce works for the salt factor. I also always use liquid smoke, garlic powder and onion powder. Those are what I always use for my base. I do not measure...I guesstimate. It all depends on how much meat you are marinating.

I use enough soy sauce to get a good covering of the meat. And I sprinkle about a 1/2 tsp to 1 tsp of the powders and probably about a tablespoon of the liquid smoke.

The meat I use is the beef for bulgogi that can be bought at the commissary. You can use any lean, thinly sliced meat, flank steaks work well. I cut my meat into strips before marinating. Typically they say you should trim any fat off your meat because leaving fat on can cause your jerky to spoil quickly. We never have jerky in our house long enough to spoil so I don't bother with that step.
This is my awesome marinating bowl that I've had for years that helps with the marinating. Once all the ingredients are mixed together I let it marinate at least overnight. I have let it marinate for 4 hours and it was still quite tasty.

I have an awesome food dehydrator that gets my jerky done in about 4 hours. You can use your oven though. If using your oven, cook at a low temperature (175-225 max) for 4 or so hours. Watch your jerky though, there is such a thing as jerky that is too dry.
Here is a picture of original and spicy jerky.

Okay, so here is my so-called recipe for those who like it all together.

Easy Beef Jerky
1-2 lbs of lean, thin sliced meat (make sure you trim fat if you are going to store for extended period of time)
1/4 cup - 1/2 cup Soy Sauce (depends on how much meat, 1/4 cup works for 1-2 lbs)
1 tsp - garlic powder
1 tsp - onion powder
1 Tbsp - liquid smoke (can be found in hot sauce, steak sauce section of store)

Mix together and add meat, marinate overnight.
Dehydrate in your food dehydrator following manufacturer instructions or in oven at 200 degrees for 4-6 hours.

Variations: Different flavors soy sauce, adding red chili pepper flakes, tabasco sauce, ect.

Saturday, July 2, 2011

Sunny's Fake Crepes

I got back from a week at Girl's Camp with 22 amazing girls from my church and wanted to share with you some of the fun and yummy recipes that we had while we were "roughing it".

One of the sweet 12 year old's brought some of her family's favorite recipes and this was one of them! I wish I had thought to take pictures of our food while there but honestly I was a little busy trying to keep meal time under control. I have pics of the preparation and lots of the eating but I try to minimize posting pictures of other people's children. Since I won't post those pics I had to recreate in our kitchen. I know my husband didn't mind being the taste tester!


Sunny's Fake Crepes
Nutella
Mini-marshmallows
Tortillas
Strawberries
Whipped Cream (which is not pictured because it was hanging out in the fridge)

Spread some Nutella on the tortilla, then sprinkle a FEW marshmallows (when they melt they spread) on top (do not be overzealous like the person typing this entry, it makes for a big gooey mess, trust me on this!).

Place on a heated griddle (a frying pan works well too). We used a cast iron griddle on a propane stove while camping. Heat until tortilla is slightly toasty and marshmallows have softened. About one minute on each side.
Garnish with whipped cream and sliced strawberries! Enjoy!